.backtotop { position: fixed; bottom: 10px; /* increase value to move position up */ right: 0px; /* increase value to move position left */ color: #000000; /* color of text */ background-color: #ffffff; /* background color of button */ font-size: 12px; /* changes size of text */ padding: 10px; /* add space around the text */ text-transform: uppercase; /* change text to all caps */ letter-spacing: 1.0px; /* space between letters */ } .backtotop:hover { background-color: #333333; /* color of background on hover over */ color: #ffffff; /* color of text on hover over */ text-decoration: none; /* no underline */ }

Monday 31 October 2016

Sun-dried Tomatoes

These are the easiest to make yourself and absolutely delicious!

It's so strange, but if you search for "sun-dried tomatoes" on the web, the first instruction is - turn on your oven.  Well - NOT in Namibia, probably not in all of Africa!  Here, our sun-dried tomatoes, truly are SUN-dried!


Here are our tomatoes, fresh from the garden.

All shapes and sizes - just make sure they are fresh and cut out any bad spots. I prefer to also cut out the little hard stem area. It's not a necessity, but I prefer them without that little hard bit.


NEEDED:

* tomatoes
* coarse salt
* olive oil, for storage


METHOD:

* wash your tomatoes
* cut out any bad spots and the stem
* cut into quarters
* evenly space on a large board
* give a light sprinkle of salt
* cover with a net or gauze
* put out in a sunny spot

Depending on the weather, they should be ready to enjoy in 3 to 4 days!


You can see how they shrink once dried.

Now you can store them - either dry, or in jars of olive oil.

I prefer the olive oil, but they don't last for months and months like this.  I never found that to be a problem, because we eat them long before they have time to go bad!

The jars make lovely gifts too.

Use these delicious home made, sun dried tomatoes in your salads, with biscuits and cheese, on top of your home made bread....

ENJOY!

Monday 17 October 2016

No Thermometer Required Ricotta

Strictly speaking this is a recipe for Paneer (a cheese used in Indian cuisine), but it is totally interchangeable with Ricotta in any recipe.  Making your own cheese is so exciting! You're going to love this easy recipe - it's quick, using ingredients you probably already have in your pantry, and best of all - no thermometer required!


Ingredients-
Fresh milk - NOT longlife! Don't try it!
Lemon juice (fresh or bottled) about 1-2 tablespoons.
(Vinegar works just as well, if you don't have lemon - you need less vinegar than lemon)


Method -
Pour 1 liter of milk into a pot.
Place on stove and just bring to the boil.
It doesn't actually need to boil - just start foaming up.
Once, I forgot it on the stove and it nearly boiled over - the cheese still came out perfectly, so you don't need to stress too much about exact temperatures!

Add the lemon juice- about a tablespoon at a time. I actually don't measure; just squirt it out and give a quick stir.
After each addition give a quick stir to see if curds are forming.
The curds (thick white bits), should separate from the whey (pale, yellow-green liquid) quickly.
Add more lemon/vinegar until you see the separation start - as in the picture.
Remove pot from heat!
Leave to separate, undisturbed for 10 minutes.

After 10 minutes, pour the mixture thru a sieve lined with
cheesecloth (I use those cheap white ones you buy in Chinatown).
Make sure to save the whey!  This can be used for the liquid on your home-made bread. (recipe still coming)
It takes a few minutes to drain.
If you get impatient, you can speed up the process by folding up the corners of the clothe and squeezing it out a bit.


Here is my cheese after a I squeezed it out.
It makes about 1 small tub of cheese.
Now you can use it as is in cheesecake recipes or crumbled in your garden salad.

We like to add some herbs and garlic and use as a spread for our Wednesday biscuits and cheese evenings.

Together with  radish leaf pesto(recipe still coming) - delicious!

The recipe is so quick and easy, you can have Ricotta on hand whenever you need it.  It tastes better than store bought, and you know it's super fresh and healthy for your family!

Enjoy, and please let me know how it turns out for you.

Monday 10 October 2016

Raised Bed Gardening

Did anyone try the homemade mayonnaise, from last week? Please let me know how it turns out if you do!

Today, we going to look a little at our raised bed garden.

Raised beds work well as you save on :
1) SPACE - the beds can be as big or small as you want them to be, even boxes count as raised beds
2) WATER - no precious water is wasted on pathways; you only water your beds
3) COMPOST - you don't spread your expensive compost or manure over a large area
4) TIME - best of all, because you are packing a lot of veggie growth into a small area, you spend very little time weeding!


Here you can see three of my raised beds.(as well as my unsightly compost bin! more about that in another post)

I began the back one first and then the middle one a few weeks later, and the front one only 2 weeks ago.

You can use whatever you have for your raised beds.  I know mine are unsightly, but they were free to make and provide us with a fresh salad almost every day of the week!


This is a closer look at my first bed.  This gives an idea of what the square foot garden is about. Instead of planting in long rows you divide your bed into blocks, each about a square foot.  For those of us in Namibia/South Africa - that's about the size of our old school ruler, squared.

Then, in each square you plant a different veggie.  I like this method because I can see immediately what's coming up, or what hasn't come up.  Then I can reseed as needed.


In this bed I have different 'blocks' growing, of carrot, baby spinach, radishes, parsley, kale, beetroot, Swiss chard, kale again.

When I plant the seeds, I draw a picture of the bed and note down where each seed is planted.  Once the seedlings start emerging it's easy to spot the weeds, because I know exactly what I planted, and where.

This site has a lot of info on raised, square foot gardening.  You will also find how many seeds of each type to plant in each square foot.  This method calls for much smaller space between each plant, so you get maximum use from your small bed.

Having just returned from visiting our friends in Windhoek, who have the most lovely vegetable garden, I can't emphasize enough that what is needed for a good veggie garden (besides enough water, of course) is COMPOST!

Try it this week - make a bed for your garden, buy a bag of compost to add to your soil, get a head start by buying seedlings from your local nursery and let me know how it goes.

In a few weeks you could be eating your own salad!


Monday 3 October 2016

Whole Egg Mayonaise


Doesn't that just look good enough to tuck into?

There is NOTHING like homemade mayo!  It is so totally different to the store bought variety, it actually deserves a different name.  Rich, creamy, and whatever flavour you would like it to be.  And best of all - this version only takes 30 seconds to make, plus a few minutes to get your ingredients together.

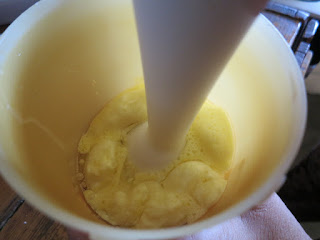
The secret is - you absolutely must have a stick blender, and a container which is just the right size for your blender to fit into.

Here goes the foolproof, creamy mayo recipe and detailed instructions:


1) In your correct size container, place all your ingredients
1 whole egg
juice from 1/2 lemon (or from a bottle)
1/2tsp salt
1/2 tsp sugar
1/2 - 1tsp mustard (I haven't tried it with powder)
garlic - clove/crushed/flakes
1 cup seed oil

SECRET - the yolk MUST be whole!  If it is even a tiny bit broken, this does not work!  The only time I flopped this recipe, was when I tried to do it with a broken yolk.  I usually tip my egg in first, so that if it breaks, I can take it out without wasting the other ingredients.


2) Now for the 30 second blend!

Carefully place you blender directly onto the yolk. Start your blender and don't move it for a full 20 seconds!

You will notice the oil start emulsifying out the sides.

(Just a note on the oil - for health reasons you might prefer coconut or olive oil, but a normal seed oil works well, and there is no overpowering olive/coconut taste, which you might get with one of the other oils.)


3) After 20 seconds, start moving your blender gently up and down to incorporate/emulsify all the oil into your mixture, for about another 10 seconds.

There you have it - 30 second mayo!

Now taste and adjust according to your preference - maybe add a little more lemon or sugar?


4) Delicious homemade whole egg mayo
Enjoy it with last week's garden salad for a winning recipe!

If you try this - please leave your comments.  I would love to hear how it works out for you.

Coming next week - A look at what's growing in the garden.